


1.安装包依赖
pip install opencv-python
pip install face-recognition
如果安装face_recognition过程中报错,提示:“CMake must be installed to build the following extensions: dlib”,则需要安装CMake
pip install cmakecmake安装成功后再安装face_recognition
可以使用国内镜像安装,否则可能比较耗时,国内镜像如下:
- 清华:https://pypi.tuna.tsinghua.edu.cn/simple/
- 阿里云:https://mirrors.aliyun.com/pypi/simple/
- 中国科技大学: https://pypi.mirrors.ustc.edu.cn/simple/
- 华中理工大学:https://pypi.hustunique.com/
- 山东理工大学:https://pypi.sdutlinux.org/
- 豆瓣:https://pypi.douban.com/simple/
执行脚本的时候后面加上对应的镜像地址:
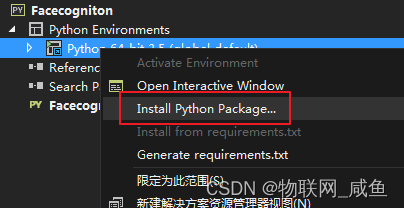
pip install xxxxx -i https://pypi.tuna.tsinghua.edu.cn/simple/如果使用的是Microsoft Visual Studio ,则可以直接在项目目录下的Python环境上右键,选择Install Python Package... 安装对应的开发包
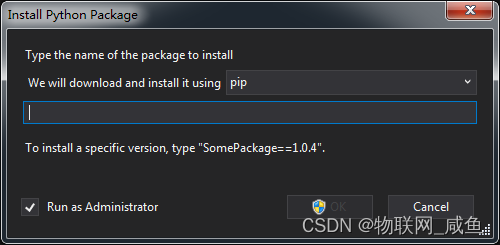
在输入框里输入对应的开发包名即可,如果使用国内镜像,则在包名后面加上 -i https://xxxx即可
例如我使用阿里云镜像安装face-recognition

点击OK后,会给一个提示框,点击“确定”继续即可

然后就可以在VS下面的输出中看到安装进度了

2.代码示例
import os
import cv2
import numpy as np
import face_recognition
import time

#对人脸集合进行编码进行处理
def findEncodeings(images):
    encodeList=[]
    for img in images:
        #灰度处理
        img=cv2.cvtColor(src=img,code=cv2.COLOR_BGR2RGB)
        #face_encodings对图片对象a_images进行编码并返回数组0位置编码结果
        encode=face_recognition.face_encodings(img)[0]
        encodeList.append(encode)
    return encodeList

#获取当前存储的人脸编码集合
def findExistsEncodeingList(img_path):
    images=[]
    #现有的人脸编码集合
    existsEncodeingList=[]
    #列出已经上传的所有图片
    imgList=os.listdir(img_path)
    #处理存储的图片得到其人脸编码
    for pic in imgList:
        img=cv2.imread('{}/{}'.format(img_path,pic))
        images.append(img)
        classNames.append(os.path.splitext(pic)[0])
    #计算findEncodeings的耗时
    start =time.clock()
    existsEncodeingList=findEncodeings(images)
    end = time.clock()
    print('Running time: %s Seconds'%(end-start))
    return existsEncodeingList

#保存文件名,也就是图像中人物的名称
classNames=[]
img_path='Picture'
cap=cv2.VideoCapture(0)
existsEncodeingList=findExistsEncodeingList(img_path)
while cap.isOpened():
    #读取当前摄像头的画面
    ret,frame=cap.read()
    #给摄像头画面一个尺寸大小
    frame=cv2.resize(src=frame,dsize=(1078,760))
    frameRGB=cv2.cvtColor(src=frame,code=cv2.COLOR_BGR2RGB)
    #对摄像头读取的检测人脸
    facesLocate=face_recognition.face_locations(frameRGB)
    #进行特征编码
    faceEncoded=face_recognition.face_encodings(frameRGB,facesLocate)
	#遍历检测的人脸和库中读取的图片进行对比,计算其相似度
    for (top,right, bottom,left),face_encoding in zip(facesLocate,faceEncoded):
        #进行匹配
        matchs=face_recognition.compare_faces(existsEncodeingList,face_encoding)
        #计算相似度
        distance=face_recognition.face_distance(existsEncodeingList,face_encoding)
        #判断是否匹配
        name='unknow'
        for index, item in enumerate(distance):
           if item<0.38:
                if matchs[index]:
                    #得到匹配到的图片名称与相似度值
                    name='Similar photos exist: {}; similarity value:{}'.format(classNames[index],item)
                    break
        #初始化面部捕捉框显示绿色
        color1 =(0,255,0)
        if name =='unknow':
            #未能识别的时候显示蓝色
            color1 =(255,0,0)
        #画面部捕捉框
        cv2.rectangle(img=frame,pt1=(left,top),pt2=(right,bottom),color=color1,thickness=2)
        #在捕捉框上添加匹配到的图片信息
        cv2.putText(frame, name, (left,top-8),cv2.FONT_HERSHEY_SIMPLEX, 0.35, color1, 1)
    cv2.imshow('frame',frame)
    #按下回车键结束
    if cv2.waitKey(1)&0xFF==13:
        break
cap.release()
cv2.destroyAllWindows()
代码里面每行基本上都有注释,所以这里不做过多解释,其中发现在启动的时候比较慢,加上了对方法执行时间的打印,最终定位到了这行代码:
#face_encodings对图片对象a_images进行编码并返回数组0位置编码结果
encode=face_recognition.face_encodings(img)[0]
原因应该与图片的分辨率、大小有关。另外还发现在调用摄像头进行检测的时候,视频画面存在严重的卡顿,因为我外接的是一个工业级高清摄像头在电脑上,应该也是因为分辨率与图片的大小设置的太大导致的。

这里的0.38是相似度,值越小代表越相似,一般设置在0.4左右即可,如果是同一个摄像头采集的人脸然后进行识别相似度在0.3左右。


 3万+
3万+


 被折叠的 条评论
为什么被折叠?
被折叠的 条评论
为什么被折叠?
 到【灌水乐园】发言


